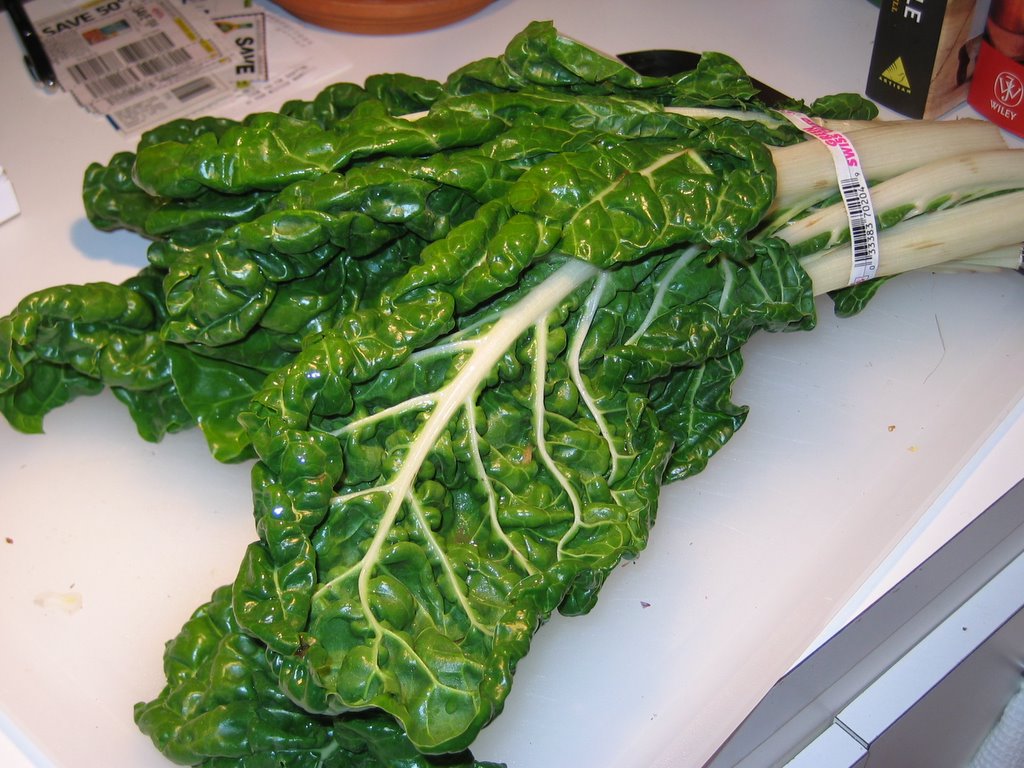
February 27, 2006

Swiss Chard

So my friend Alison has recently been obsessed with a website that quizzes you on the food you eat and then tells you just how vitamin-deficient you are as a result of your poorly chosen diet. Intrigued, I tried it out myself only to finish the process feeling too malnourished to move from my seat. Okay, so these websites do tend to set the bar pretty high as they are usually created by vegetable-hugging fanatics who think food like cookies are only meant for the devil, but it did make me rush to the produce section my market.

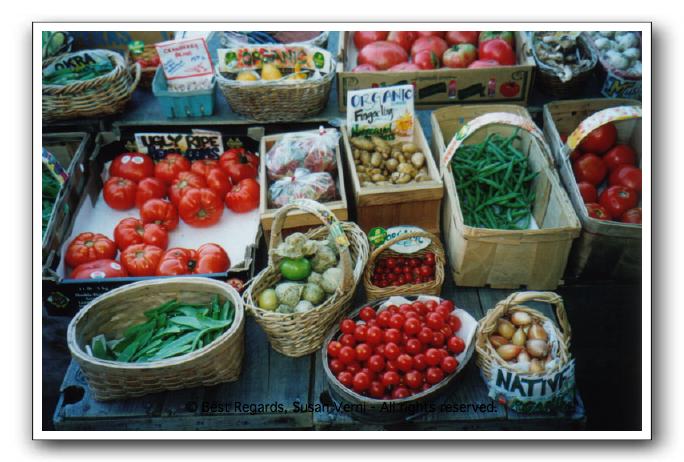
I stood in the produce section looking around for a new vegetable to try. As I was standing here paranoid about my lack of nutrition, the produce guy asked me, “Where are have you been? Hiding? I haven’t seen you here in a while!” Okay, okay, I get the idea. More vegetables, less dinners out. Check.

My eyes then settled on the Swiss chard. I have seen cooking shows prepare this leafy green, but I had yet to try it out myself. Knowing that I love spinach, I thought this would be a good variation to try out—and it is a great source of beta-carotene and dietary fiber! So I gathered a bunch of Swiss chard and headed to the checkout counter.

So what is Swiss chard? Well, this large leafy green grows from a special beet (not the kind you are used to eating, but one that is grown for its leaves). If you don’t like beets (for me, this is one of the few foods I dislike), do not let that deter you from eating this green as it has no beet taste! In fact, Swiss chard tastes a lot like spinach (and no bitter taste!).

The Swiss chard I have here has white stalks, but it also comes with red stalks. You may notice from the pictures that the stalks are quite meaty. When you cook the leaves, you need to cut out the stalks but you can save them to cook separately (you can’t cook them all as one since the stalks will take much longer to cook than the leafy part). I did not try the stalks, but I read that they can be prepared just as you would prepare asparagus. I think it would also be nice to add them chopped back to the cooked leaves to allow for a variety of texture to your Swiss chard dish.

As with most leafy greens, Swiss chard must be thoroughly washed. Since it is grown close to the ground, the leaves tend to hold dirt in their crevices. I washed the Swiss chard leaf by leaf under the running faucet, but everything I read suggested taking a big bowl of water and washing the leaves in this , two or three times if needed.

When it comes to preparing Swiss chard, you can pretty much make it just as you would make spinach. Here is how I prepared it (per 2 side servings):
  • 2 cups water
  • ½ bunch of Swiss chard (about 3-4 large leaves), chopped width-wise into 1 inch thick pieces (don’t forget to remove the stems)
  • 2 tbsp butter
  • 1 garlic clove, minced
  • ½ lemon zest
  • Salt and pepper
  1. Boil water in a large sauté pan.
  2. Add Swiss chard and cook until wilted.
  3. Drain water.
  4. In a small, separate pan over medium low heat add butter. Once butter is melted, add garlic and lemon zest. Let cook for a minute (this allows the lemon oils to release themselves from the zest, and for the garlic’s flavor to mellow).
  5. Add butter mixture to Swiss chard and mix.
  6. Add salt and pepper to taste.
Since I had some Swiss chard leftover, I made it again a couple days later (don’t let your Swiss chard sit in your refrigerator for more than two days). Since boiling Swiss chard causes much of the vitamins to transfer to the water, which only is later thrown out, I decided this time to sauté it.

Here is how I sautéed the Swiss chard (per 2 side servings):
  • 1 tbsp butter
  • 1 tbsp olive oil
  • 1 garlic clove, minced
  • ½ lemon zest
  • ½ bunch of Swiss chard (about 3-4 large leaves), chopped width-wise into 1 inch thick pieces (don’t forget to remove the stems)
  • Salt and pepper
  1. In a sauté pan over medium heat add butter and olive oil.
  2. Once butter has melted, add garlic and lemon zest and let cook for a minute.
  3. Add Swiss chard and cook until wilted.
  4. Add salt and pepper to taste.
Overall, I have to admit that I liked the boiled version better—it was smoother tasting. Also the sautéed version left a little film in my mouth, similar to what spinach leaves behind. However, in my quest for earn a higher score on that darn nutrition website I will probably keep to the sautéed version to guarantee my intake of vitamins!

Labels: , ,

February 26, 2006

Steak with Crimini Mushrooms and Shallots in a Red Wine Reduction

I may be in the minority here, but I love staying in on Friday nights. Any other night I love meeting friends for dinner and drinks, but Friday nights are all about me. I come home from work, quickly change into my pj’s, and relax for the evening knowing that I have the entire weekend ahead of me.

When having “me time” it is only logical that I have a nice dinner. I often order in sushi, but sometimes I prefer just cooking myself a really nice meal. So that is what I did this past Friday evening. I prepared a steak served with a red wine reduction sauce that included crimini mushrooms and shallots. It was a lovely dinner.

If you would like to treat yourself too, here is how I made it (per serving):

Steak
  • 2 tbsp olive oil
  • 1 steak filet
  • Salt and pepper
  1. Pre-heat oven to 350 degrees.
  2. In an oven proof pan over high heat, add olive oil.
  3. As pan is heating, salt and pepper steak.
  4. Once pan is hot, carefully place the steak into the pan—do not move it around (moving it around makes the steak stick and not brown properly). Let steak brown on each side, about 1-2 minutes each side.
  5. Transfer pan to oven. For medium to medium rare, keep in oven about 5-6 minutes.
    Once the steak has reached your desired “doneness,” take it out of oven and let it sit for 5 minutes. You need to let the steak sit to allow the juices to re-distribute. If you cut the steak immediately, all the juices would flow out in the first cut and the rest of the steak would be dry. That would be a bummer.
Sauce
  • 3 tbsp olive oil
  • 7 crimini mushrooms, sliced (See Note 1)
  • 1 large shallot, sliced (See Note 2)
  • ½ cup red wine (See Note 3)
  • ½ tsp dried thyme (or 1 tsp fresh thyme)
  1. In a pan over medium heat, add olive oil.
  2. Add mushrooms and shallot slices and cook until mushrooms are cooked thoroughly. Mix often to keep shallots from burning.
  3. Add wine and thyme, and cook until the wine has reduced by half. This should not take long.
  4. Serve sauce poured over steak. Very pretty, isn’t it?
Enjoy your special night!

Notes:

  1. Crimini mushrooms are baby portobello’s. Therefore, like Portobello mushrooms criminis are a bit “meatier” in taste than other mushrooms, which is why I chose them for this dish. When cleaning any mushroom, never wash them in water like other vegetables. Mushrooms are like sponges and they will just soak up the water, causing them to be tough when cooked. Therefore, clean mushrooms by wiping them with a damp cloth.
  2. What is a shallot? Shallots offer a flavor similar to that of sweet onions with a hint of garlic. Although people often assume they are a part of the onion family, they are actually their own species. Shallots are most commonly used in vinaigrettes and sauces.
  3. Keep in mind that when you cook with wine, you are concentrating the flavor. Therefore, always use a wine that you would drink—avoid “cooking wines” found in the grocery store.

Labels: ,

February 23, 2006

The Salt of the Earth

Okay, so you think you know everything about salt? This most basic of seasonings actually has a lot more to it than meets the eye so don’t be so cocky...

For starters, aside from being a seasoning, salt is essential to our bodies and is one of the most basic components to the earth (remember—the world is 2/3 covered by ocean salt water, after all). When added to food, it not only helps bring out the flavor, but it also draws out the moisture. Furthermore, salt is a natural preservative for foods. And did you know that at one point in time salt was considered so valuable that it was used as currency? So salt is actually quite a versatile and interesting seasoning. Who knew?

So what are the various types of salt, you ask? Well, here is a summary:

Table Salt
This is your most commonly found salt—think salt shakers at the diner, if you will. Table salt is pulled from dried up underground salt deposits left by salt lakes. It does not dissolve as easily as other salts, which makes it taste stronger since it sits on your tongue longer. It also includes additives to help prevent caking in damp weather. These additives cause a harsher taste than that of other salts. Therefore, table salt is best used in cooking and baking where the taste blends in and not as a finishing salt.

Kosher Salt
Kosher salt is basically table salt that has been rolled into “salt flakes.” The shape of the flakes allows for it to better pull moisture out of food such as meats. Furthermore, the greater surface area allows for it to provide a good strong salt flavor without over salting. Kosher salt does not contain additives so the taste is more pure than that of table salt. As a result, this inexpensive salt is best used for both cooking and as a finishing salt. It also tends to be the most widely used salt by chefs.

Sea Salt
A bit chunkier of a salt is sea salt. As you might guess, it is obtained from ocean water deposits that have dried up leaving behind salt crystals. Sea salt tends to be the priciest of the various salts since it is more difficult to obtain. I primarily cook with a cheaper sea salt that is commonly found in the grocery store. However, more expensive gourmet sea salt should only be used sparingly as a finishing salt because its unique taste is lost when used in cooking (there is no need to waste this precious salt if you can’t taste it!).

The following are some various types of sea salts:

Gray Salt (Sel Gris)
If you watch Easy Entertaining with Michael Chiarello, you most likely have noticed that he is always using gray salt. What is it? Gray salt is found on the Atlantic coast of France. This slightly moist salt gets its light grey color from the clay in the salt flats. Its taste is bold and pure.

Fleur de Sel
This sea salt actually is created from gray salt only when the weather conditions are just right (hence the higher price tag since the supply is not as great). Under these specific conditions the fleur de sel (“flower of salt”) crystals grow from the grey salt. For every 80 pounds of grey salt created, only one pound of fleur de sel is found. For Christmas my mother gave me a bottle of this salt (some people get iPods, I get salt!), and I LOVE it. There is truly a better taste to this salt than that of your normal, everyday salt so I save it for special meals as a finishing salt. Sometimes I dip my finger in it and just have a little taste of the salt on its own (I have also been known to lick the inside of microwave popcorn bags, but whatever). Fleur de sel’s crystals are very delicate, which makes it a delight to taste not only for its flavor but also its texture.

Maldon Sea Salt
This English salt is created by boiling ocean water, which causes pyramid-shaped hollowed crystals that crumble easily between your fingers. This unique shape allows for a delicate, light salt flavor.

So there you go! There is more to salt than you thought, huh?

Labels:

February 22, 2006

White Turkey Chili

This has been a hectic week at work as I am trying to catch up from my days away from the office while dealing with several clients’ deadlines. So when I come home, I am in the mood for something hearty yet easy.

I was looking through one of the seven food magazines I subscribe to (I started with three, but then my mom went a bit overboard subscribing four more for me—you see, she is quite excited that I am following her footsteps with my love of food!), and read a recipe for white turkey chili. This was just what I was in the mood for, so it became my dinner earlier tonight.

My thoughts? I really liked it, and will definitely make it again! This recipe is really quick and easy (it took me about 20-30 minutes to make), healthy, and tasty. It has a more subtle, clean taste than that of regular chili. You should try it!

Here is the recipe I used (per 1 hearty serving, adapted from Everyday Food):
  • 2-3 tbsp olive oil
  • 1 small onion, chopped
  • 1 jalapeno pepper, minced (Take seeds out for mild flavoring, or keep some in if you want it hot. Also, be sure to wash hands right after you handle the pepper! The oils can be very painful if they find their way into your eyes or a cut!)
  • 2 garlic cloves, minced
  • 1 tsp cumin
  • ½ tsp coriander (See note 1)
  • Salt and pepper
  • ¼ lb ground turkey
  • 1 can cannelloni beans (14 ounces), drained and rinsed
  • ¾ cup chicken or turkey broth
  • Cilantro and sour cream, to garnish
  1. In a medium saucepan, heat oil over medium heat. Add onion, jalapeno pepper, garlic, cumin, coriander, salt and pepper. Cook, stirring occasionally, until the onion is translucent. About 3 to 4 minutes.
  2. Add ground turkey, breaking up with spoon, and cook until no longer pink about 2-3 minutes.
  3. Add beans and broth. Turn heat to high until the broth begins to boils. Once boiling starts, turn heat back to medium and simmer until thickened, 5 to 10 minutes. Mash some of the beans with the back of spoon.
  4. Serve in bowl garnished with sour cream and cilantro.

Enjoy!

Notes:
1) Did you know that coriander is simply cilantro seeds grounded up? Well, it is. It originates from Morroca and Romania, and is common in Indian food. Know where else it is found? Gin and American cigarettes. Huh? Well, that is what the Culinary Cafe told me!

Labels: ,

February 20, 2006

Ski Weekend Dinners

Sorry I have not posted anything in a little while--I have been out of town for work and then play, but I am now back!

The play part of my departure was in Vermont. Every year about fifteen friends and I go up to the Killington, VT. We rent a house for the weekend to ski during the day and hang out in the house at night. I love it, and we all look forward to it throughout the year. This year the ski conditions were not the best (too much ice) but that never hurts how much fun we have together.

So who cares about my ski trip? Is that what you are thinking? Well, I bring it up because one of my favorite parts to hanging out in the house with my friends is dinnertime (another favorite is us all sitting in front of the fireplace). Keep in mind that most of us New Yorkers have small apartments and can not have this many people over for dinner, much less be able to sit fifteen friends all around one table. So this in itself is such a treat to me.

I love food for lots of reasons. Obviously it tastes good, and it keeps me alive. I also love it because food is a great way to bring people together. It is an activity that brings us to one place, sitting down, and enjoying each other’s company. Families strive to have family dinners for this reason, just as how many of our holidays are centered around cooking (Fourth of July bar-b-que’s, Easter brunches, Thanksgiving feasts, etc.). Therefore, it only seems appropriate for me that our annual ski trip includes good-ole family style dinners to celebrate us all being there together.

Clearly after a day’s worth of skiing, no one is in the mood to cook for fifteen people! Lucky for us we have two very much appreciated friends who help us out. Melissa comes from an Italian family who recently came over to the States before she was born. True to the Italian nature, before the big ski trip she and her mother make HUGE amounts of pasta and breaded chicken cutlets that only need to be re-heated. What a treat to come home and know that a truly Italian meal is about to be enjoyed. Unfortunately, I did not have a chance to take pictures of Melissa’s and her mom’s dishes, but trust me that their work is very good!

The second night we enjoyed Gemma’s lasagna (made from her mum’s recipe). This was served with salad (we had to at least pretend we were being health conscious for the weekend) and pre-prepared garlic bread. Again, the lasagna and garlic bread only needed to be reheated in the oven before all fifteen of us sat down to an awesome meal. And of course these dinners were so great and created such a fun atmosphere that we would find ourselves still sitting around the table hours after we had empty plates.

We ate lots of good food, drank lots of red wine, and enjoyed lots of great laughs. I am looking forward to next year’s ski trip (and dinners) already!

Labels: ,

February 14, 2006

Eggs with Goat Cheese, Caramelized Onions, & Thyme

So you are having overnight guests and you want to serve a nice breakfast to them, but want to keep it simple, right? Okay, or you just want to start off your own day on a good note! Either way, this egg dish satisfies both situations.

I like making scrambled eggs and adding stuff to them better than omelets because if you are serving more than one person, being able to only make one omelet at a time is quite a pain. Plus by the time you make the last person's omelet, the first is already cold! Oh, my eggs are so much better...

So here is what you need (per serving):
  • 2 tbsp olive oil (drizzled twice around pan)
  • Red onion slices (I like to slice the onion so that the slices are rings--they look prettier on the eggs that way. Keep in mind when deciding how many onion slices you want that the onion will cook down a little.)
  • 3 eggs (or 2 will work if you aren't as hungry)
  • 1 tsp fresh thyme (dried thyme will work as well)
  • 1 pad of butter
  • Some goat cheese
  • Salt & pepper to taste
  1. In a pan over low heat add olive oil and onion slices. Cook slowly in order to allow the onions to caramelize.
  2. While onions are cooking, mix eggs and thyme in a bowl.
  3. In another pan over medium heat, add the butter.
  4. Once the butter has melted, add the eggs and scramble them until cooked.
  5. When the eggs are ready, place them on serving dish and top with goat cheese. Don't be stingy with the cheese--it is yummy! Top the cheese with the caramelized onions and garnish with some fresh thyme on top. Salt and pepper to taste.
Enjoy!

Labels: , ,

February 12, 2006

Valentine’s Dinner with my Man

There is nothing better than after a long day at work, coming home to my man, Brighton. He is perfect. Since he is always home when I am finished with work, he kindly warms up the couch for me to plop on and kick up my feet. Brighton then cuddles up with me and makes my day’s worries melt away.

With Valentine’s Day here to celebrate those we love, I must cook a special meal for Brighton. So what does a cat want for Valentine’s? (Oh, yes, Brighton is a cat—you didn’t think I actually had a man waiting at home and warming up the couch for me everyday, did you?)

For this special feline in my life, I decided to make him meatballs. My friend, Susan, shared with me a meatball recipe for cats so I decided to try it out. Here is what you need:
  • ½ lb ground beef
  • 1 small carrot, grated
  • 1 tsp grated cheese
  • 1 tsp brewers yeast (I did not have this and I think it was fine)
  • ½ cup whole wheat breadcrumbs
  • 1 tsp dried catnip
  • 1 egg
  • 1 tbsp tomato paste

1. Preheat oven at 375 degrees.
2. Mix all ingredients together—use your hands; they are your best tools for this!
3. Roll meat into balls, about an inch in diameter and place onto a cookie sheet.
4. Place in oven and cook for about 12 minutes, or until they are browned.

May your meatballs be purrfect for the special feline in your life! Ha, ha, ha...my friends and family are sooo rolling their eyes right now!

If you would like to adopt a little man (or lady) of the feline sort, go to Petfinder.com and find a pet who needs a home!

Labels:

February 08, 2006

Best Regards Cards for Your Special Foodie

Ahhh, the beauty of foodies. Yes, if you enjoy reading this blog, you may just be a foodie. Foodies pretty much just love food. We love eating it and learning about it. We love incorporating it into our lives either as an afternoon activity of cooking, giving a dinner party, curling up with a cookbook, or treating ourselves to a nice restaurant. So what is the perfect gift for a foodie? Well, I have an idea…my friend Susan Verni’s Best Regards cards.

Susan has incorporated her love for photography into cards, and they are quite beautiful and special! I have sent some of her cards to friends, and they come on nice cardstock paper with an actual photograph adhered to the front. Although her photos vary in content, she does have several that focus on food. It is these photos that I think would make a nice gift to that foodie in your life (or as a nice gift to yourself!).

My favorite card of hers is of vegetables at a farmers market (Botanicals Collection). Susan says that she took this photo at Hatch’s Produce Market on Cape Cod in Wellfleet, Massachusetts. Aside from how beautiful the photo is in itself, I love it because of all the possibilities the vegetables hold. Gazpacho? Roast potatoes? Homemade salsa? The cute baskets, and signs such as “Ugly Ripe Tomatoes,” also add to this card.

A close second favorite of mine is her card picturing a wine menu from a lovely neighborhood cafe in Italy that Susan visited (Italy Collection). It reminds me of when I traveled around Italy myself, basically anticipating my next meal throughout the trip! Oh, Italian food how I love thee. I literally gained about 5 pounds in that week because the food was so unbelievable! So I love this card as it reminds me of the excitement of sitting at a menu in Italy knowing I was about to enjoy an unbelievably good meal.

Other cards that Susan has that feature food include apples hanging from their tree with the sky and clouds in the background (Botanicals Collection). This was taken at an apple orchard in Warwick, New York while Susan was searching for the just the right Gala and Macoon apples for an apple crisp.

Susan also has a photo of fallen apples in a Maryland orchard (Botanical Collection). She took this photograph while searching for the perfect apples for her niece and nephew’s apple bobbing contest at their Halloween contest. Sticking to the fruit tree theme, Susan also has a card with an orange tree from the New York Botanical Gardens.

If your foodie is more of a sweets person, then you can choose among Best Regards’ photos of Salt Water Taffy Barrels (At the Coast Collection), Gingerbread Men and Women (from the Seasons Greetings Collection), or the Flowered Cupcakes (Celebrations Collection).

So if you are looking for a cute gift or a special card to send to a friend I suggest browsing through Susan Verni’s Best Regards cards (http://www.bestregardscards.com/). Her cards are sold in various boutiques in New York City, and you can also order them from her website.

Labels:

Rosemary Garlic Bean Spread

Oh how I love food! This here is the perfect dish to snack on or to entertain with. Oh, and with a glass of wine it is the perfect treat! The rosemary and garlic are quite pronounced in this spread, which provides a fun burst of flavor with every bite.

I choose fagioli cannellini beans for this spread because they have a subtle taste that allows for the rosemary and garlic to shine through nicely. I also like these beans because they are larger and can mush-up a little bit for the spread.

So here is what you need:
  • 1/4 cup extra virgin olive oil (I never use measurements but usually have an idea of how much to write down for my recipes. This here I am a little unsure about--you may need a little more.)
  • 1-2 cloves of garlic, minced (I use two because I love the strong garlic flavor!)
  • 1 1/2 tbsp chopped fresh rosemary (Fine, you can use dried but it isn't as good--y'all know how I feel about dried herbs! If you use dry, use about 1 tbsp).
  • 1 can (14 oz) of fagioli cannellini beans, drained and rinsed
  • Salt and pepper to taste
  • Sliced baguette bread (really, any nice bread will work--I just like the size of baguette slices)
  1. Mix olive oil, garlic, and rosemary together in a bowl (duh, who would use a plate? but I feel that I should say it anyway to sound professional)
  2. Add beans and mix until the beans are fully coated with mixture.
  3. With the back of your spoon, press down on the beans a few times--just enough to slightly mush them.
  4. Add salt and pepper to taste.
  5. Cover and let sit in the refrigerator for at least a few hours. You do this to allow the flavors to meld together and the beans soak up all that goodness. Additionally, it helps soften the rosemary.
  6. Before serving, let beans sit at room temperature for a little while (at least 20 minutes). No one wants to eat frigidly cold beans!
  7. Dabble onto baguette slices and serve (or of course you can serve it in a small bowl with the bread on the side for people to serve themselves.)
Yum-yum! Keep in mind that the beans by themselves may taste a bit strong in flavor, but once combined with the bread, the flavor will mellow out.

Labels:

February 07, 2006

Forget Peanut Butter and Jelly, move up to Cashew Butter with Dried Cranberries

Y'all, this is good! I love this because it is a simple upgrade from the plain old peanut butter and jelly and is a nice little surprise since cashews are used instead of peanuts. This spread is also so easy to make; and since you are making the cashew butter yourself, it is super fresh.

I serve this cashew butter as a sandwich, or on its own with some baguette slices on the side. I also love it just on its own on a spoon! When I came up with this idea, I originally thought it would need some honey but all it needs are the nuts and cranberries. So the ingredients list is small, but here you go:

  • 1/2 pound unsalted cashews (make sure they are unsalted!)
  • Handful of dried cranberries
  1. Place the unsalted cashew nuts in a food processor and let run until a cashew butter is formed. It will take a little while (5-10 minutes) so don't fret if yours does not seem to be turning into a butter! The nuts will go from being chopped, to a grain-like consistency, to a ball, then to butter.
  2. Transfer the cashew butter to a bowl and add the dried cranberries. Mix well.

Damn that was easy and yet it will be such a crowd pleaser!

Labels:

February 06, 2006

Super Bowl Party Treats

O'Hara and Christina have been hosting their Super Bowl parties for the past five years, and this year was particularly a big one because O'Hara is from Seattle and Christina's family lives in Pittsburg (for those of you not in the know, these are the two cities whose teams played in the Super Bowl--I only learned this a few days ago myself!). I have to admit that this was my first year to attend the big, famous party and now I know to never turn down another one of their Super Bowl party invitations again!

O'Hara and Christina went all out for this party. There were about 30 people who came, and I think there was enough food for about 60 people! Oh gosh, where do I start? They had two types of chili--meat and veggie. I of course opted for the meat chili. Now I know I am a bit bias, but my friend Carrie and I make the world's best chili so I wasn't expecting much from O'Hara and Christina's (sorry guys!) BUT it really was good! They also set up in three cute bowls cheddar cheese, sour cream, and cilantro to top off the chili.

As I served myself some chili, O'Hara turned on the oven to start cooking the chicken wings. They bought one batch of wings pre-made, and made a second batch of wings themselves by just rubbing hot sauce and worcheshire sauce onto the chicken. As O'Hara was working on this, Christina was finishing up the “pig in a blanket”. Can I tell you how much I love these? I think they are so underrated, frankly. Christina just took miniature hotdogs and wrapped them with Pillsbury crescent roll dough. She then popped them in the oven at 375 degrees for 10 minutes, or until browned.

Another one of my favorites is seven layer dip. Yum! O'Hara makes it with refried black beans, sour cream mixed with taco seasoning, black olives, canned sliced jalapeños, chopped tomatoes, avocado pureed with a little salt, cheddar cheese, and scallions (for those of you counting, it was actually eight layers!) and then she pops it in the oven just long enough to melt the cheese. Another chip accessory they had was homemade salsa. Christina makes this by taking a can of chopped tomatoes and adding cilantro and onion to taste.

Now, no party can do with out cheese so they also had two cheese logs. Both cheese logs were made by mixing cheddar cheese with cream cheese and then adding red pepper, onion, and worcheshire sauce. They also added smoked salmon to one of the logs--so good! Both logs were then rolled in chopped nuts and parsley to make them look as pretty as they tasted.

In addition to all this great Super Bowl food, some of the guests brought food too! Samantha and her boyfriend made a football cake and others brought brownies (so good), salami, dips, and the list goes on.

Oh, and did I mention that O'Hara and Christina got a quarter keg of Brooklyn Lager? They kept it in their tub and decorated it with little footballs. My favorite was the ducky sitting on the tub dressed in his football gear. So cute! They also made jello shots in the colors of the teams playing.

Wow, with all this food and beer, something tells me that O'Hara and Christina will be eating Super Bowl food and finishing off that keg for the next week! Mmm, may be they need me to come over for dinner this week to help...

Labels:

February 03, 2006

English is Italian - New York, NY

On Tuesday night, four of us headed to English Is Italian located in Midtown (622 Third Ave., at 40th St). The chef there is Todd English who also has Olive’s in the W Hotel. English is Italian opened this past year so I was really looking forward to trying it out.

As always, my paranoia made me early so the host directed me to the bar for a drink while I waited for my friends. The walk there is quite impressive. Unlike pretty much every other restaurant in New York, English is Italian is very large and open. I actually felt like I could have been in suburbia though the atmosphere is still very New York. The bar itself sits on a high-up porch that overlooks the main dining area. It has your normal bar but also has many lounge areas to relax in. For a Tuesday night, there was just the right amount of people to create a nice but fun atmosphere for after work drinks.

My disappointment came when I opened the drinks menu. The cheapest glass of red wine was $10! Now I can appreciate the bar wanting to serve only good wines, but I believe you can find good wines at all price ranges and they should have been able to offer something at $7 or $8. This is an Italian restaurant after all! At these prices I opted for a vodka martini ($11)—might as well get more bang for my buck!

My friends then arrived and we moved onto the dining area. Just as the room is so large, so are all the tables, plates, etc. I felt like Goldie Locks sitting at Pappa Bear’s table! We laughed when we realized the “charger” plates on the table were actually our plates to eat on! But I thought that aspect was fun. It was fun being Goldie Locks.

So the way English is Italian works, you do not order your own dishes. Instead, the table as a whole orders either the two course meal ($34/person) or three course meal ($39/person) and the waiters just start bringing on the food. All dishes are family style, and you get about 3-4 items per course. We chose the three course meal and it was a tremendous amount of food!

Now I am horrible with understanding accents so I did not catch all the items, but here is my best try:

Appetizer
Blah Blah Rice & Cheese Balls
Blah Blah Lamb Chops
Chicken Patee, Blah Blah, and Hummus Dips with Bread

Pasta
Fettuccini Alfredo with Mushrooms
Ravioli Stuffed with Sweet Potato
Risotto with Blah Blah and Squid

Entrée
Lamb Shank with Blah Blah and Blah Blah (something spicy and something squashy)
Salmon with Blah Blah
40 Garlic Chicken

The dishes were hit or miss. The Blah Blah Lamb Chops were all fat—or at least my piece was. The Fettuccini Alfredo with Mushrooms was ordinary. And I liked the 40 Garlic Chicken, but it tasted just like what I make at home with out much effort. On the upside, I LOVED the Risotto with Blah Blah and Squid. The “Blah Blah” was something green—an herb—and the dish was just sooo good. I also loved being able to taste a wide variety of dishes. Overall, we ate about 10 dishes.

My synopsis? I liked English is Italian but I did think it was overpriced. Including a bottle of wine, the price-fix meal, tax and tip, it came out to $62/person. Add on our pre-dinner drinks and it was $74/person. Especially for a week night, I was a bit flabbergasted by this! If I pay that much for dinner, I want something more in the quality. Although I loved trying out so many different dishes, 75% of them were not fabulous enough on their own.

I do think this is a good restaurant to take clients to when on an expense account (then who cares how overpriced it is?). And I would consider going back to the bar for after work drinks. I thought it was tacky how expensive their wines by the glass were, but I did like the atmosphere. Unfortunately, there just are not many good non-touristy bar/lounges in mid-town so I might be willing to pay a couple extra bucks for that aspect. I also think their bar is a good option for a first date—they even serve some food so you can eat up if your first date gitters are making you drink too much wine!

Labels: ,

February 02, 2006

Feeling Blah Chicken Pot Pie without the Chicken or the Pie or Most the Vegetables

So I don't think this will make the recipe books, but it was just what I was in the mood for tonight. I think my body is flirting with having a cold because I feel so blah. And when I feel blah, I always crave chicken pot pie. My problem--I didn’t want to go through the effort of actually making chicken pot pie! When feeling blah, that is way too much effort!

I didn't feel like dealing with the pastry or the chicken, and well, there are just too many vegetables to worry about too. So ultimately I decided that what I really wanted was the yummy filling simplified by using one ingredient. I went with mushrooms since, well, they are the easiest (I of course bought them pre-sliced).

I have to admit that I have never made chicken pot pie so I sort of winged my way through this (another reason why I don’t think this will make the recipe books). Since I do not recall the measurements so much, I will talk you through it.

I started by making a roux to help give the "soup" some thickness. To make a roux, you just cook equal parts butter and flour until it turns a soft brown (I used about 2 tbsp of each; this process takes away the flour taste). I then added the mushrooms and sprinkled them with salt to help bring out their moisture. I had about two cups of mushrooms, but I would recommend using only one cup. When the mushrooms had cooked through, I then added the chicken broth--about two cups. From here I seasoned with salt and pepper, and added about two tablespoons of thyme. The final result was just what I was looking for--the perfect comfort food that took no effort!

If I were making this again and wanted to serve it to others, I would add a little sour cream. I love sour cream in soups. I know, I know, it probably sounds weird but it gives soups a nice creaminess with a light taste. I would also added some lemon juice or zest to lighten the flavors and bring out the thyme more. I think these changes would help make the soup more special. However, for tonight, it really was just what I was in the mood for! So if you are feeling blah, I do recommend this chicken pot pie without the chicken or the pie or the vegetables!

Labels: ,