April 29, 2008

Avocado and Watercress Salad

I was thumbing through the light recipes on Epicurious looking for an idea for lunch. I came across this recipe for an avocado and watercress salad, which was featured in Gourmet magazine. This recipe evidently originates from Natori, a Japanese restaurant in New York. The recipe looked so great. A soy sauce based dressing that includes grated apples? How interesting! And how can you go wrong when avocados are a main feature to the dish? Plus I love the bitter taste of watercress.

I think this dish took me a whopping 15 minutes to make—perfect for a lunch. I even had some leftover to have along with my dinner. The dressing is so tasty that you should save any extra dressing for salads later in the week. I bet it would also be great served over steamed veggies, potatoes, or even a fish.

A hint: When preparing the watercress (it needs to be just the leaves and thin stems), hold the stems of the bunch in one hand. With your other hand take a chef’s knife and at an angle slide the blade along the stems away from yourself such that the leaves and thin stems are sliced off leaving behind the thicker stems. Keep doing this until all leaves are removed.

Okay, here is the recipe from Gourmet magazine (May 2008), which makes 6 servings:

  • 1/4 cup rice vinegar (not seasoned)
  • 1 tablespoon grated sweet onion such as Vidalia or Walla Walla (use large holes of a box grater)
  • 1/4 cup finely grated peeled Gala apple (use small holes of box grater)
  • 4 teaspoons soy sauce
  • 1 teaspoon sugar
  • 3 tablespoons vegetable oil
  • 6 cups watercress (thin stems and leaves only; from 1 large bunch)
  • 1 firm-ripe avocado
  1. Stir together vinegar, onion, apple, soy sauce, and sugar until sugar has dissolved, then stir in oil.
  2. Just before serving, toss watercress with enough dressing to coat.
  3. Quarter, pit, and peel avocado, then cut crosswise into 1/4-inch-thick slices. Gently toss with watercress.
Enjoy!

Labels: , ,

October 05, 2006

Simple Tomato and Arugula Salad with Goat Cheese

Yesterday I entered my fourth decade in life. To appropriately honor this 30th birthday, I took the day off work (as well as the remainder of this week!) to truly treat myself. Like a true New Yorker, I began my day with a bagel and cream cheese accompanied by a frothy latte. Then I was off to the Oasis Day Spa for a Swedish massage, courtesy of my dear friend Laura. Oh the luxury!

Since it was Wednesday, the farmers market was going on in Union Square. So after my spa treatment I meandered down there and roamed the market—one of my favorite things to do in New York. Many of New York’s local farmers set-up their stands here and offer an abundance of seasonal fresh produce.

Since my best friends are taking me out to celebrate my birthday this weekend, I opted to have a couple of them over for a simple dinner last night. I already knew what I wanted to serve for the main dish but was undecided about the starter. So I leisurely roamed the market scouting out the options. I wanted to serve something simple to make so that I wouldn’t have to spend too much time in the “kitchen” (I put “kitchen” in quotes because I more so have a kitchen nook), but at the same time elegant and special.

I have lately been really into tomatoes—so sweet, refreshing, and healthy. So I opted for a salad that would focus on these veggies. I chose heirloom tomatoes, which I believe are the tastiest of the tomato varieties. These awkward looking tomatoes are certainly tastier than the ordinary beef steak ones! I also opted for a variety of colors and sizes to make the salad especially pretty.

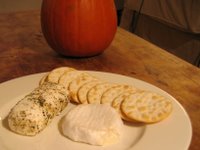
I wanted to pair the tomatoes with a leafy green so I chose arugula. This peppery leaf was the perfect contrast to the sweet taste of the tomatoes. I also wanted to add a third texture and flavor to the salad so after visiting the leaf guy, I walked over to the goat cheese lady. Here I bought a garlic and herb goat cheese log to top the salad and to also serve with crackers prior to the meal. Yum! The nice goat cheese lady also introduced me to a goat’s milk brie, which I also had to get. It was just too yummy looking to pass up, and I am a cheese slut afterall.

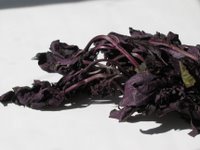
I was still yearning for something extra, so I continued to meander and found a farmer selling a wide variety of fresh herbs. Amongst his selection was an assortment of basil. In one of my food magazines I remember them explaining all the types of basil. I was particularly intrigued by purple basil, which I had never even heard of. This farmer had it so I was sold and chose this as my final ingredient to my salad. This variety of basil is a bit stronger in taste than the regular sweet basil, and the rich color was the perfect contrast to my salad.

After stopping by a lovely sidewalk cafe for some white wine and oysters, I finally made it home and prepared my special salad. The final product was simply perfect—easy to put together, aesthetically pleasing, and extremely flavorful. Here is the gist of the “recipe” (per serving):
  • Handful of arugula leaves
  • Variety of tomato slices—large/small, red/yellow
  • Dash of diced shallot
  • 5 dabs of goat cheese
  • 1 tsp of balsamic vinegar
  • 1 tsp extra virgin olive oil
  • 1 tbsp sliced basil (purple if you can find it)
  • Coarse salt and pepper
  1. Lay a bed of arugula leaves on a small plate.
  2. Spread a layer of the tomato slices on top of the arugula.
  3. Sprinkle shallot pieces over the tomatoes, followed by the goat cheese dabs.
  4. Pour the balsamic vinegar and extra virgin olive oil over the salad.
  5. Garnish with sliced basil
  6. Add salt and pepper to taste.
Enjoy!

Check-in later for my post about my entree dish (creamy polenta served with sautéed mushrooms, pancetta, and thyme topped off with a white wine reduction cream sauce)…

Labels: , , ,

June 04, 2006

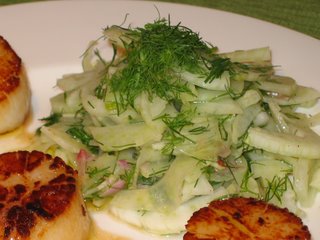
Jamie Oliver’s Pan Seared Scallops with Crispy Bacon and Sage Salad

This past weekend my friend Gemma hosted our group of friends at her place for the weekend in honor of our friend, Allison, who is sadly moving to San Francisco. Despite the rain, we made it through a Met’s game at Shea Stadium (well, through the 6th inning—it was pretty cold). Then Gemma surprised us with a nice dinner for the evening—just what we were in the mood for! What a great way to spend some time with a friend who is moving, where we can just eat at our leisure and hang out all night talking.

Since the weekend was in honor of Allison, Gemma asked her to choose the menu. Allison’s choice for the entrée was Jamie Oliver’s Pan Seared Scallops with Crispy Bacon and Sage Salad. Evidently Gemma has made this dish for Allison in the past, and it is her favorite.

After we munched on a selection of olives, Italian cheese, and smoked sausage; dinner was served. I can understand why this dish is Allison’s favorite. There are a lot of flavors layered into the salad that compliment one another very well. The salad is also relatively light for a summer meal, yet has a bold, warm flavor.

To make this dish yourself, the following is the recipe (for 4 servings):
  • 12 thin slices of streaky bacon or pancetta
  • 2 tbsp olive oil
  • 8 leaves of fresh sage per person
  • 12 scallops
  • Salt and freshly ground black pepper
  • Juice of 1 lemon
  • 8 heaping tbsp cooked lentils
  • 4 large handfuls of green salad leaves
  • Olive oil and lemon juice dressing
  1. Fry the bacon or pancetta in a small amount of olive oil in a hot pan.
  2. When the bacon or pancetta is nearly ready, add the sage. The bacon and sage will cook and crisp up at about the same time.
  3. Once they are cooked, take them out of the pan and place them onto some paper towels to drain.
  4. Put the pan back on the heat and, when it is very hot, add a little drizzle of oil and fry the seasoned scallops.
  5. These will take about a minute each side; the skin will go slightly crisp and golden brown.
  6. When both sides of the scallops are cooked, squeeze the lemon juice over the top and give them a stir. This will start to caramelize the outside skin even more.
  7. Take the scallops out of the pan and put them into a dish.
  8. Using the same pan reheat the lentils.
  9. Dress the salad leaves with the olive oil and lemon dressing and divide between 4 plates.
  10. Sprinkle the crispy bacon and the crispy sage leaves over the 4 salad plates. Then place the scallops around the salad.
  11. When your lentils are hot just sprinkle on top.
Enjoy!

Labels: , , , , ,

May 28, 2006

Grilled Southwestern Salad with Shrimp

For Memorial Day weekend, my friends and I spent one evening grillin’. Speaking of grilling, let me use this opportunity to make a very important note—grilling is not the same as bar-b-queing.

Ever since I moved up North, I have noticed that these northern people think throwing some hamburgers on the grill is bar-b-queing. Obviously they have never been to the South where we know what true bar-b-queing is! Contrary to grilling, bar-b-queing generally requires pork ribs (or beef, when in Texas) that have been slowly cooked over a grill allowing the smoke to gradually seep into the meat. Anything else is just grillin’.

Now that we have that cleared up, let’s move onto what we grilled up. Most of our friends grilled hamburgers. Carrie prepared the hamburgers by mixing the meat with finely chopped onions, worcestershire sauce (can any of you pronounce this sauce?), and salt. They looked great!

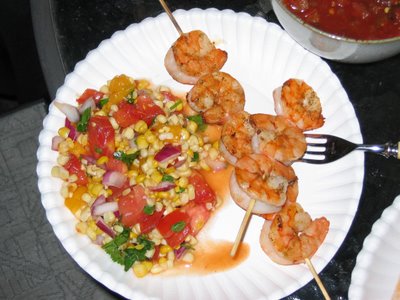
Alison and I opted for a grilled southwestern salad with shrimp. Aside from having to spend some time chopping, this is a very simple dish and a nice deviation from the normal grilling food. Bobby Flay would be proud.

Before I share the recipe, I should point out that when grilling shrimp, you need to place the shrimp on kebab sticks. Otherwise, the shrimp would just fall through the grill. If the kebab sticks you are using are made of wood, make sure you first soak the sticks in water to prevent them from burning—or worse, catching on fire. That would be a bummer.

Okay, here is how I made this meal (for about 4 servings):

Grilled Southwestern Salad
  • 2 large tomatoes, diced
  • ½ large red onion, diced
  • 1 cup fresh cilantro, chopped
  • Juice and zest from 1 lemon
  • 2 tbsp olive oil
  • 1 tsp cayenne pepper (optional)
  • 4 ears of corn
  • Salt and pepper to taste
  1. Mix first five ingredients in a large bowl.
  2. Grill corn until grill marks appear. Cut corn kernels off the cob and add to the bowl. Note that the cobs will be very hot. I used a napkin when holding the top of the cob to cut the kernels off.
  3. Add salt and pepper to taste.
Grilled Shrimp
  • 1 ½ lb shrimp, peeled
  • Cumin (you can also use cayenne pepper or paprika)
  • Pepper
  1. Place shrimp onto kebabs.
  2. Sprinkle a little cumin and pepper over shrimp on both sides.
  3. Place shrimp kabobs on grill and cook through. Remember to not over cook or the shrimp will become tough.
Very easy and very good. Enjoy your Memorial Day weekend!

Labels: , , , , ,

May 01, 2006

Fiery Thai Beef Salad

My friend Shirley hosted a brunch at her place this past Sunday. I was expecting something pretty low key but Shirley went all out—we even ate off her china! Each of us were responsible for an item, but Shirley nonetheless still made several dishes as well. One of them was a Thai styled beef salad.

Shirley had clipped this recipe from an old Cooking Light magazine—July 1999, to be exact! All these years she kept the recipe and finally used it this past weekend. Shirley noted that she omitted the fresh lemongrass because she couldn't find it and thought it would be too fibrous in the salad. However, she was able to find all the other ingredients very easily.

The outcome? I loved this and will definitely make it myself too. It was very tasty and the cilantro and mint provided with a great, unique flavor.

The recipe, from Cooking Light, is as follows (for 4 servings):

Dressing:

  • 1/3 cup fresh lime juice
  • 1/4 cup chopped fresh cilantro
  • 2 tablespoons brown sugar
  • 1 tablespoon water
  • 1 tablespoon Thai fish sauce
  • 5 garlic cloves, minced
  • 2 Thai, hot red, or serrano chiles, seeded and minced

Salad:
  • 1 (1-pound) flank steak
  • 1/4 teaspoon salt
  • 1/8 teaspoon black pepper
  • Cooking spray
  • 6 cups torn romaine lettuce
  • 1 3/4 cups quartered cherry tomatoes
  • 1 cup thinly sliced red onion, separated into rings
  • 1/4 cup coarsely chopped fresh mint
  • 2 tablespoons sliced peeled fresh lemon grass
  1. To prepare dressing, combine first 7 ingredients in a bowl; stir well with a whisk.
  2. Prepare grill or broiler.
  3. Sprinkle both sides of steak with salt and pepper. Place steak on a grill rack or broiler pan coated with cooking spray, and cook 6 minutes on each side or until desired degree of doneness. Let stand 10 minutes. Cut steak diagonally across grain into thin slices; cut each slice into 2-inch pieces.
  4. Combine steak, lettuce, and remaining ingredients in a large bowl; add dressing, tossing to coat.

Labels: , ,

April 09, 2006

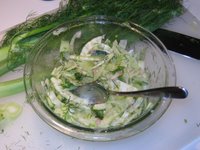
Fennel Salad

As it is now becoming warm out, I have been craving light, summary salads. So when I was in the market and spotted the beautiful fennel, I decided that would make up my next salad.

I actually had never worked with fennel before but see chefs on The Food Network using it all the time. As I recall, these chefs would describe the taste as being similar to licorice, and after having tasted it myself, I definitely agree. Fennel has a very unique and refreshing flavor. It also maintains a nice crunch, which makes for a great salad.

So here is how I made the salad (for either 2 side servings, or 1 entrée serving):
  • Juice from 1 lemon
  • Extra virgin olive oil (enough so that the lemon juice to oil ratio is 1:2)
  • 1 Fennel bulb, sliced very thinly (See Note 1)
  • 1 Shallot, diced
  • 3 tbsp Fennel fronds, chopped (See Note 2)
  • Salt and pepper, to taste
  1. In a bowl add lemon juice. Now slowly pour in the olive oil while whisking to emulsify the dressing.
  2. Add remaining ingredients and toss
Wow that was easy and yet so good and perfect for a warm spring day! Enjoy!


Notes:
  1. You only want to use the bulb portion of the fennel. Some grocery stores, like the one I bought my fennel at, leave the stalks on the fennel. Just cut these off where they attach to the bulb and put aside. Do keep the stalks, though, because we will use the fronds in just a little bit. Now thinly slice the bulb, discarding the tough core.
  2. What? Your fennel didn’t come with the stalks and fronds? You freak! No, no, do not worry. Most markets sell just the fennel bulbs so you are not really a freak. In place of the fronds, I suggest using flat leaf parsley or dill. If you use dill, add about 2 tbsp (1 tbsp or less, if dried).

Labels: , ,

April 05, 2006

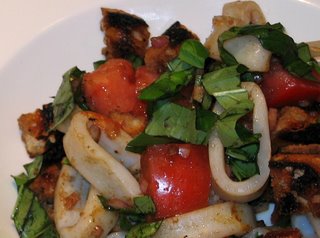
Bread & Squid Salad

On Sunday as I was getting ready to meet up with my friend for brunch at Inoteca, I had the Food Network on in the background (generally what my TV is always turned on to!). Boy Meets Grill with Bobby Flay was the show, and I caught him making a salad with grilled tomatoes, bread, and squid mixed with a mint leaf dressing. I did not catch the details, but I knew it was definitely something I wanted to try.

Growing up, my mother (aka, “Momma”) used to make such a great bread salad that was similar to this. Her’s was using bread that was lightly toasted mixed with diced tomatoes, basil, kalamata olives, and balsamic vinaigrette. I loved the simplicity of this salad yet how flavorful it was. The bread pieces would soak all that vinaigrette goodness yet remain slightly crunchy. This mixture of textures was such a refreshing delight, especially on warm days.

Walking home from brunch on such a beautiful Spring day in New York, I knew I had to make this salad as an ode to the start of warmer weather! So I picked up the ingredients that would allow me to make a combination of Bobby Flay’s and Momma’s salads. The result—perfectly yummy!

Here is how I made it for about 2 small servings (measurements can be very flexible):

Salad
  • 8 slices of baguette bread, about 1 centimeter thick
  • 3 tbsp olive oil
  • 5 squids
  • ½ large tomato, diced
  • ½ cup of chopped basil
Dressing
  • 2 tbsp balsamic vinegar
  • 3 tbsp extra virgin olive oil
  • 1 shallot, diced
  1. Brush slices of bread with olive oil on both sides, and then place in slices grill pan over medium-high heat. Let grill until lightly toasted with grill marks. If you do not have a grill pan, toasting bread in a toaster or oven will work as well.
  2. As bread is toasting, start making dressing (be sure to keep an eye on the bread, though, to make sure it does not burn!). Mix all dressing ingredients together well. (See Note 1)
  3. When bread is properly grilled (or toasted), start grilling the squid. You only need to cook the squid until it becomes opaque, about a few minutes on each side.
  4. As squid is cooking, cut the bread slices into bite-size pieces.
  5. Once the squid is cooked through, cut the squid width-wise into bite-size pieces.
  6. Toss squid, bread, and the remaining ingredients in a bowl. Add salt and pepper to taste.
This is a great salad—Enjoy!

Notes:
  1. In order to best emulsify the oil and vinegar, first add the vinegar to your bowl. With one hand rapidly whisk the vinegar. While whisking, slowly pour in the oil with the other hand.

Labels: , , , ,

January 31, 2006

Dinner Parties at Gemma's

I love dinner parties—especially Gemma’s. Gemma is our English friend who moved over to the states for college and never left. Lucky for us, she brought over her English ways of hospitality, which include her fabulous dinner parties (dinner parties are very popular in England).

Gemma is a great cook as she is really not afraid to try any recipe, and if she finds a particular dish a challenge to make, it gives her all the more reason to keep trying it until she gets it perfect. Such a good friend to have…

Last Sunday evening Gemma and her husband, Sebastian (a 6’8” Californian), hosted six of us for dinner. Since it was a “work night,” the evening was a bit more chill than usual (her last event was a champagne brunch which began at 12 noon and ended at 11pm) but the food was of course just as great.

The following was the menu:

Mixed Greens Salad with Goat Cheese, Walnuts, and Balsamic Dressing

Farfalle with Sausage, Tomatoes, and Cream

Baked Ricotta and Mascarpone Tart with Chocolate and Orange

Since Gemma is a pro at giving these dinner parties, she was smart to keep the salad simple (but tasty!) and the entrée was something she found in Bon Appetit’s January 2006 issue as being fast and easy. I think this is important when giving dinner parties because the last thing you want to do is be stuck in the kitchen the whole time slaving away. The key is choosing recipes that do not taste like they were “quick and easy,” which of course these recipes succeeded at.

As often is the case, the dessert was the main attraction. This Gemma did slave away on all day. For starters, get this; she made her own pastry for the pie! Sebastian commented that when they woke-up Sunday morning, Gemma’s first words were, “I’ve got to get started on the pastry!” She was disappointed by the end results (aren’t all artists their own biggest critics?), but I thought it tasted great.

The pie filling was very unique by combining both chocolate and orange flavors with the ricotta and mascarpone. If you are up to the challenge, I do recommend that you try this recipe. And keep in mind that you can buy the pie crust already made at the market!


Here are the recipes from the evening:

Mixed Greens Salad with Goat Cheese, Walnuts, and Balsamic Dressing
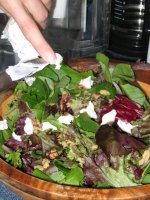
  • Bag of mixed greens
  • Goat cheese
  • Couple handfuls of toasted walnuts
  • Balsamic dressing (balsamic vinegar and olive oil mixed)

Simply mix all ingredients together. You can toast the walnuts in the oven or stovetop, but keep an eye on them as they can burn quite quickly.


Farfalle with Sausage, Tomatoes, and Cream
Makes 6 servings.
Bon Appétit, January 2006, Cara Brunetti Hillyard, Hamilton, VA

  • 2 tablespoons olive oil
  • 1 pound sweet Italian sausages, casings removed
  • 1/2 teaspoon dried crushed red pepper
  • 1 cup chopped onion
  • 3 garlic cloves, minced
  • 1 28-ounce can crushed tomatoes with added puree
  • 1/2 cup whipping cream
  • 1 pound farfalle (bow-tie pasta)
  • 1/2 cup (packed) chopped fresh basil
  • Freshly grated Pecorino Romano cheese

Heat oil in heavy large skillet over medium-high heat. Add sausage and crushed red pepper. Sauté until sausage is no longer pink, breaking up with back of fork, about 5 minutes. Add onion and garlic; sauté until onion is tender and sausage is browned, about 3 minutes longer. Add tomatoes and cream. Reduce heat to low and simmer until sausage mixture thickens, about 3 minutes. Season to taste with salt and pepper.Meanwhile, cook pasta in large pot of boiling salted water until tender but still firm to bite. Drain, reserving 1 cup cooking liquid. Return pasta to same pot. Add sausage mixture and toss over medium-low heat until sauce coats pasta, adding reserved cooking liquid by 1/4 cupfuls if mixture is dry. Transfer pasta to serving dish. Sprinkle with basil. Serve, passing cheese separately.


Baked Ricotta and Mascarpone Tart with Chocolate And Orange
Serves 8
Jamie Oliver, “Jamie’s Kitchen”
  • 1 x basic sweet pastry recipe (see below)
  • 250g/9oz ricotta cheese
  • 250g/9oz mascarpone
  • 125g/41/2oz icing sugar
  • zest of 3 oranges
  • seeds from 2 vanilla pods
  • 2 eggs, separated
  • 100g/31/2oz best-quality cooking chocolate (70% cocoa solids), roughly chopped
  • 1 egg, beaten
  • icing sugar, for dusting

Make the pastry and line a loose-bottomed 28cm/11 inch flan tin. Bake blind (i.e. with no filling) and allow to cool. Roll the extra pastry out to the same thickness in a long rectangular shape, dusting as you go, and divide into 14 strips 2.5 cm/1 inch wide. Set these aside - you will need them to finish off the tart.

Turn the oven down to 170°C/325°F/gas 3. Whip together the ricotta, mascarpone, icing sugar, orange zest, vanilla seeds and egg yolks until smooth and shiny. In a separate bowl whip up your egg whites until stiff - you can test if they're done by holding the bowl upside down over your head. Obviously the mixture should stick to the bowl and not fall on your head! Gently fold the egg whites into the mixture.

Pour into your cooled tart mould and sprinkle the chocolate over the top. Lay 7 strips of pastry across the tart, equally spaced, and then place the other 7 the other way on top of them like a lattice. Use your thumbs to trim any excess pastry off the side of the mould - this will stick it to the pastry below. Brush the pastry with a little of the beaten egg and then dust with a little icing sugar. Bake in the preheated oven for 40-45 minutes.

This tart can be served hot or cold with some ice cream, crème fraiche or cream.


Sweet Pastry

  • Make 2 x 28cm / 11 inch Tart shell
  • 250g/9oz butter200g/7oz icing sugar
  • a medium pinch of salt
  • 500g/just over 1lb flour
  • seeds from 1 vanilla pod
  • zest of 1 lemon
  • 4 egg yolks
  • 2-4 tablespoons cold milk or water

You can make this pastry by hand or in a food processor. This is enough to make 2 x 28cm / 11 inch Tart shells

Stage 1: Cream together the butter, icing sugar and salt, then rub or pulse in the flour, vanilla seeds, lemon zest and egg yolks. When this mixture has come together, looking like coarse breadcrumbs, add the cold milk or water. Pat together to form a ball of dough. Lightly flour and then squeeze it into shape. The idea is to get your ingredients to a dough form with the minimum amount of movement, i.e. keeping your pastry flaky and short (the more you work it the more elastic it will get, causing it to shrink in the oven and be chewy, and you don't want that to happen).

Stage 2: Roll the pastry into a really large, short and fat sausage shape, wrap it in Clingfilm and put it in the fridge to rest for at least 1 hour.

Stage 3: Carefully slice off very thin slivers of your pastry lengthways. You can make the slices thicker if you like, but remember that the tart will take longer to cook. Place the slivers all around your tart mould, fitting them together like a jigsaw. Push the pieces together and tidy up the sides by cleaning any excess pastry from the rim of the mould. Place in the freezer for at least 1 hour.

Stage 4: Bake them 'blind' (i.e. with no filling) for around 15 minutes at 180°C/350°F/gas 4 - this will cook them all the way through, coloring them slightly.

Once completely cooled, the shells can be filled. With baked fillings, like the Plum Tart on page 295, the tart shell has to be baked blind for around 12 minutes at 180°C/350°F/gas 4 before being filled and then baked once more.

Try this: Once your tart shell has been baked blind, brush the inside of it with a little egg white and then put it back in the oven for 30 seconds - no longer. This will give it a nice waterproof layer which will protect it from a moist filling. The pastry will stay crumbly and crisp for longer instead of going all soggy.

Labels: , , , ,

Cranberry Bean Salad

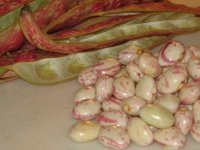
Okay, so you now know all about Cranberry Beans and have been anxiously awaiting this second post so that we can make something yummy with the beans—right?! Or are you just curious where the red specks on the beans go when they are cooked? Personally, I think I was more curious about the red specks! But let’s start with the recipe…

Since I am new to this bean (and probably you are too), I chose a recipe that serves the beans in the traditional Italian way. I think it is best to first stick to the basics to learn about the taste of the beans before making anything fancy with them. Besides, the southern European folks have been eating them much longer than us, so I trust they know what they doing!

So here is the recipe (serves 4 as a side dish):

  • 1 1/2 pounds fresh cranberry beans in pods (you can also use lima beans)
  • 2 tablespoons salt
  • 1/4 cup extra-virgin olive oil
  • 1 to 2 tablespoons fresh lemon juice, or to taste
  • 2 tablespoons chopped fresh parsley or basil leaves
  • Freshly ground black pepper to taste

Shell beans. In a large saucepan of boiling water cook beans with salt until tender and no longer mealy, 10 to 20 minutes. Drain beans and transfer to a bowl. While beans are still warm (see note 1), toss with remaining ingredients and season with salt. Serve salad warm or at room temperature. (Gourmet, June 1998)

I actually used thyme in lieu of parsley or basil because I thought it would compliment the lemon better (and I had read in other recipes that thyme is also commonly served with cranberry beans). The recipe says to serve warm or at room temperature, but I actually really did not like it warm. Once it cooled off, I liked it much more. Plus, the longer the beans sit in the dressing, the tastier they become. In fact, I liked it best the day after making it.

In taste, the cranberry beans reminded me of white beans but larger. They are denser than I expected, but I like it that way. I think the salad would go really well with roast chicken. Last night I ate it as a side to some shrimp cooked with olive oil, a clove of garlic, and thyme and that was nice too.

Now I have a question for anyone out there who might know the answer. While researching the cranberry bean, most sources said to not cook the beans in salted water because the salt would toughen the skin. (fyi, salt draws out moisture). So why does this recipe add salt to the water? I went with it thinking that perhaps the bean’s surface can break easily when cooked so the salt here is to prevent that from happening for the salad’s sake. Or perhaps it is just a bad component in the recipe? Anyone know?

Okay, now back to the mystery of the red specks…I think they simply melt off in the water. Isn’t that weird? When the beans were finished cooking, they were all white sitting in pink water. I felt bad for the pretty, red specks--such an anticlimactic ending to a beautiful life.


Notes:
1) Wondering why you should toss beans in their dressing why warm? At this point, their pores are open and will soak up the dressing better.

Labels: ,