June 18, 2008

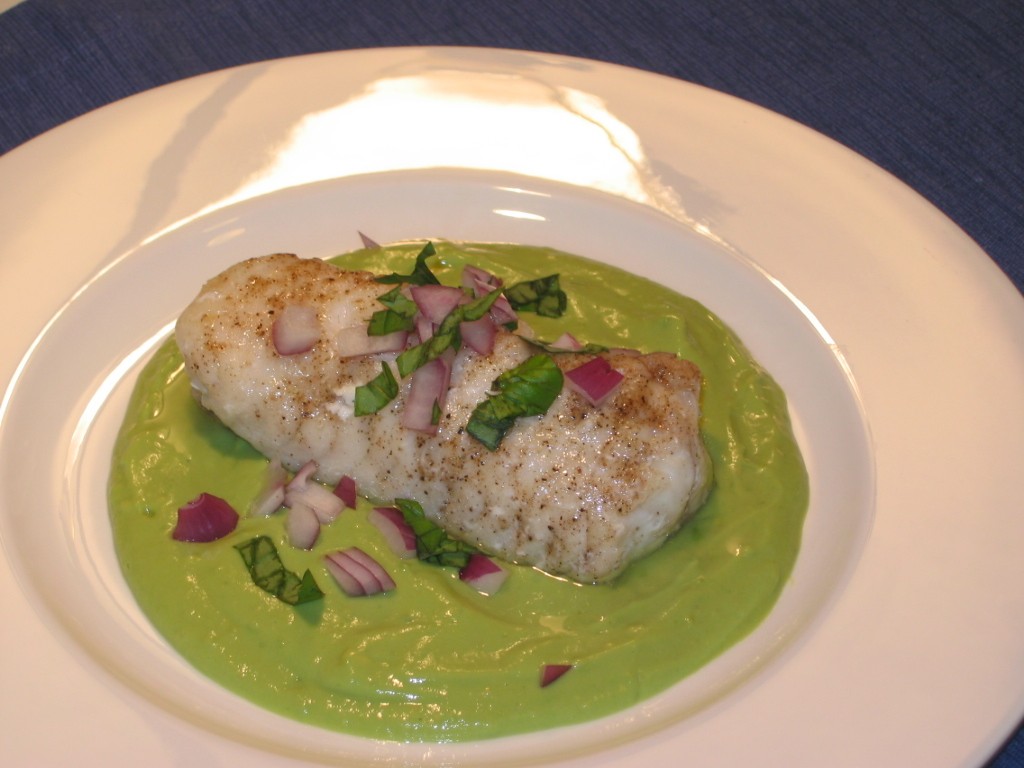
Skate with Peas & Mint

A couple weeks ago I watched the documentary, The Real Dirt on Farmer John. This movie tracks the history of farmer John’s family roots and the difficulties he faces in continuing the family business. As you can probably guess, keeping the family farm in business has been a challenge for him. The touching part of the film is seeing how much that affects him—not so much financially as much as emotionally. Farmer John is an endearing, unique character with a darling mother so of course I now picture every farmer being like him, which makes me want to rush out and support my local farmers’ market even more.

My urge to increase my visits to the farmers’ market is also encouraged by the environmental aspects. I admit it—I have never been all that into going out of my way to “save the environment.” This is mostly because I feel a bit confused by all the conflicting information. For example, one day those who buy a Toyota Prius are being patted on the back for saving our Earth only to find out the next day that making the dang car is actually worse for the environment than other alternative autos. Sheesh.

My friend, Libby, recently started a new blog called How Green Is…, which focuses on the environment in a realistic manner. Reading her blog has helped put the environment back in the forefront of my mind. I mean, I am still annoyed by all the conflicting information, but there are some things that are pretty straightforward. Such as, buying your food locally means that the food is being driven a shorter distance, which we can all agree is better for the environment. Phew.

So for these reasons (and some others, which I won’t get into now), I am now trying to run out to my farmers’ market even more.

The other day I was watching Jamie Oliver’s show, Jamie at Home. He brought us to his greenhouse where he put together a yummy looking dish with smashed raw peas and mint, which he served over grilled toast. This peaked my interest so I headed to the farmer’s market looking for ingredients to make something similar, and here is what I came up with (for 1 serving):
  • ¾ - 1 cup shelled, raw sugar snap peas
  • ¼ cup fresh mint, chopped
  • 1 lemon
  • 1 tsp plus 2 tbsp Olive oil
  • Salt
  • 1 Skate fillet (alternatively, you can also use turbot)
  • Flour
  1. Carefully chop the fresh peas, and then put them into a bowl (or you may have better luck keeping them on the cutting board). Add the mint, zest from the whole lemon, and 1 tbsp olive oil. Smash together with a pestle/ back of wooden spoon/ or fork. Squeeze one half of the lemon into the mixture. Add salt to taste (don’t be shy with the salt). (If you have a mortal and pestle, this would be ideal. Using a food processor on “pulse” would also make this easier.)
  2. Rub the sake fillet with 1 tsp of olive oil. Dredge fish in flour and shake excess flour off. Add 1 tbsp olive oil to a non-stick pan over medium high heat. Add the fish and cook on both sides until cooked through. (My fillet took about 3-4 minutes on each side.)
  3. Serve fish on plate and squeeze other lemon half on top. Spoon pea mixture onto fish. Garnish with a drizzle of olive oil on the plate around the fish.
Enjoy!

Labels: , ,

April 20, 2008

Mahi-Mahi with Blood Orange, Avocado, and Red Onion Salsa

Finally Spring is arriving in New York, which means that bathing suit season is creeping up around the corner. Got it. Note to self—Ben & Jerry’s stash needs to be replaced with fat free sorbet, fries must be eliminated from diet, no more afternoon snacks are allowed, and cheese plates…well, let’s not go too crazy.

In my quest for a light dinner I found this recipe for mahi-mahi with salsa from Bon Appetit’s February 2005 issue. This is an extremely simple recipe that is quick, tasty, and will help you fit into that yellow polka dotted bikini come summertime (or man-kini for you courageous guys out there). The recipe calls for mahi-mahi, but really any white fish should work. The fishmonger at my market did not have mahi-mahi so I used hake. Tilapia should also be a good substitute.

The recipe calls for sautéing the fish in a skillet, which will give the fish a nice lightly browned top. However, if you live in a tiny apartment without an exhaust fan in the kitchen “nook” area like myself, you may want to resort to baking the fish instead. The fish won’t look as fancy, but your apartment—and your guests—will thank you for it. Just set the oven to 350 degrees, wrap the fish in tin foil with some olive oil, and cook for 35-40 minutes per pound.

Lastly, the recipe suggests that you top the fish with the salsa. I found that there was so much salsa that it completely covered the fish (yes, there is a fish hidden in that picture above). For presentation purposes, I suggest serving the salsa on the side or under the fish with a little reserved for the top.

So here is the Bon Appetit recipe for 2 servings:
  • 1 blood orange, Cara Cara orange, or regular orange
  • 1/2 cup 1/3-inch cubes avocado
  • 1/3 cup chopped red onion
  • 2 teaspoons minced red jalapeño
  • 2 teaspoons fresh lime juice
  • 2 teaspoons olive oil
  • 2 6-ounce mahi-mahi fillets
  1. Using small sharp knife, cut peel and white pith from orange. Working over small bowl, cut between membranes to release segments.
  2. Add avocado, onion, jalapeño, and lime juice to oranges in bowl; stir gently to blend.
  3. Season salsa to taste with salt.
  4. Heat oil in heavy medium skillet over medium-high heat. Sprinkle fish with salt and pepper. Add fish to skillet and sauté until brown and cooked through, about 5 minutes per side.
  5. Place 1 fillet on each of 2 plates. Spoon salsa atop fish and serve.
Enjoy!

Labels: ,

April 03, 2007

Lemon Sole with Spring Risotto and Pesto

My friend Alison turned 30 over the weekend, which was certainly a cause to celebrate! The official birthday festivities took place on Saturday, but I was quite honored when she asked if I would cook her dinner on Sunday evening for her actual birthday. So what does one make for such an event? Something special yet easy so that I could socialize with Alison and our friend Carrie, who also joined us, while preparing dinner.

I still have risotto on my mind after making my Parmesan Risotto with Leeks and Mushrooms dish. (I also still have a very large bag of Arborio rice—used to make risotto—that needs to be used up!) So I decided to make this a part of my dish and top it off with a fish fillet.

The risotto I made was similar to my Parmesan Risotto with Leeks and Mushrooms dish, except that I replaced the mushrooms with asparagus. This added a Spring flair to the risotto, which was perfect for an April birthday. I also did not include the cream in order to make the risotto less rich.

For the fish, I chose a lemon sole fillet since this fish is light in flavor and would not fight for attention with the risotto. I think tilapia or halibut would also work with this dish for the same reasons.

Meanwhile, I still needed something that would help the dish really pop. So I decided on a pesto to top it off, but didn’t want the conventional basil and pine nut basil. Instead I chose to use watercress due to its bold flavor and walnuts because, well, I like them. I also toasted the walnuts before adding them to the food processor, which really enhanced the flavor.

Okay, so here is the recipe for 3 servings. Note that you can make the pesto ahead of time and set it aside.

Watercress and Toasted Walnut Pesto
  • ½ cup of walnuts halves, lightly toasted
  • ½ clove of garlic
  • ½ cup of watercress leaves
  • ¼ - ½ cup extra virgin olive oil (amount depends on the pesto consistency you desire)
  • Salt to taste
  1. Add the toasted walnuts and garlic to the food processor and pulse until roughly chopped.
  2. Add watercress and mix until ingredients are pureed.
  3. Slowly add olive oil until the pesto reaches the desired consistency.
  4. Add salt to taste.

Spring Risotto
  • 4 cups chicken broth
  • 1 tsp and 2 tbsp olive oil
  • 15 asparagus stalks, rough ends removed
  • 1 medium leek, chopped and rinsed (remember, you only use the white and light green part of the leek)
  • ¾ cup Arborio rice
  • ¼ cup dry white wine
  • ¼ cup freshly grated parmesan cheese (the green can kind is prohibited!!!)
  1. In a large pot, bring chicken broth to a boil. Once boiling, lower heat to the lowest setting to keep broth warm and cover.
  2. While broth is heating up, add 1 tsp of olive oil to a large sauté pan over medium heat. Add asparagus stalks and cook until asparagus is bright green. This should take a few minutes.
  3. Remove asparagus and place aside. Cut into 1 inch pieces once cooled.
  4. Now add the remaining 2 tbsp of olive oil and the chopped leaks to the large sauté pan. Sauté the leeks until they just begin to brown.
  5. Add the Arborio rice and mix until the rice is glistening with the oil.
  6. Pour in the wine and mix until absorbed.
  7. Add 1/2 cup of chicken broth and mix until the rice again absorbs the liquid and reaches a thick, creamy consistency. Continue this process, pouring only 1/2 cup of broth at a time, until the rice is tender. This should take about 20 minutes. Also note, that the amount of broth needed will vary so you may not use all 4 cups. If you need more liquid, water will be just fine.
  8. Add the parmesan cheese and chopped asparagus and mix together.

Lemon Sole Fish Fillet
  • 2 tbsp olive oil
  • ½ cup flour
  • 3 lemon sole fillets
  1. Lightly oil the fish fillets with about 1 tbsp of olive oil.
  2. Cover fillets with flour and shake excess off (be careful, lemon sole is fragile).
  3. In a large non-stick skillet over medium heat, add remaining tbsp of olive oil. Add fish fillets and cook on both sides until opaque. This will take about 2-3 minutes on each side. (My skillet was too small for all three fillets, so I just cooked them one at a time.)
  4. Place risotto onto serving plate, top with fish fillet, and add a large dollop of pesto.
Hope you enjoy this dish!

Labels: , ,

November 18, 2006

Monkfish with Avocado Sauce

My friend Susan was in California a couple weeks ago and visited an organic farm that grows avocados. As a result she came back to New York with a huge bag filled with this fabulous fruit. Seeing that I love, love, love avocados, when she offered for me to snag one from her bag I gladly accepted!

Now I obviously love guacamole, but I was interested in trying something different with my avocado. Since I am a big sauce girl (some say saucy, too), I decided to make an avocado sauce. I figured it would go really well with either chicken or seafood. Seeing that I haven’t cooked seafood in a while, I opted for this choice.

When choosing a fish to accompany the avocado sauce, I wanted a white fish that would let the sauce shine. After perusing the fish counter at my market, I decided on the monkfish. If you are not familiar with monkfish, it is very similar in texture to lobster. In fact it is often referred to as “poor man’s lobster”. Seeing that I love lobster but my budget doesn’t let me dine on it nightly, this fish was the perfect fit. I think tilapia and cod would also work well for this recipe (though note that the method of cooking these other fish would differ).

One last thing, this is a super easy recipe that is difficult to mess-up. So if you are looking for a fool proof yet gourmet-like dish to make, this is a perfect choice.

So here you go (per serving):

Fish

  • 1 Monkfish filet
  • 1 tsp Olive oil
  • Salt and pepper
  1. Preheat oven to 450 degrees.
  2. Rub olive oil onto monkfish filet. Top off with salt and pepper.
  3. Place the filet onto a sheet of tin foil and loosely wrap (like a package). Then move wrapped fish onto a baking sheet.
  4. Bake in oven 10 minutes per inch of thickness.
Sauce

  • ½ cup Haas avocado
  • Juice from ½ lemon
  • 2 tbsp Sour cream
  • 2 tbsp Milk
  • Salt, to taste
  • 2 tbsp Chopped red onion
  • 1 tbsp Chopped parsley (optional)
  1. In a large bowl mix the avocado, lemon juice, sour cream, and milk until fully pureed. (You can use a food processor, but I just used a whisk).
  2. Add salt to taste.
  3. Spoon sauce onto bottom of serving dish. Then top with the cooked monkfish filet. Garnish with the chopped onion and parsley.
Enjoy!

Labels: , ,

August 17, 2006

Turbot Fillet with Creamed Okra and Corn

A few weeks ago I made this fish dish, which was really yummy and made me feel like I was back at home in Alabama (okra is a very popular vegetable in the South). With a nice glass of white wine, it was the perfect treat. I especially love the tarragon with this as it adds a nice bite to the creaminess of the veggie mixture. As with most my dishes, this was also simple to make.

Although I made this dish with turbot, you can certainly use other types of fish too. Really any white fish, such as tilapia or flounder, should work.

So here is how I made it (per 1 serving):

Fish
  • 1 Turbot fish fillet
  • 2 tbsp Flour
  • 1 tbsp Olive oil
  1. Lightly flour the fish fillet, shaking off any excess flour.
  2. Add olive oil to a skillet over medium heat.
  3. Place fish in skillet. Cooking time will vary depending on the size of the fillet, but generally you will want to cook the fillet for a few minutes on each side. When done, the fillet should feel stiff with a slight give.
Creamed Okra and Corn
  • 1 tbsp Olive oil
  • 2 tbsp Shallot, chopped
  • 1/5 lb Okra, chopped in 1 centimeter pieces
  • Corn cut off of 1 cob
  • 1 tbsp Tarragon, chopped
  • 3 - 5 tbsp Crème fraiche (depending on how creamy you want it)
  • Salt and pepper
  1. As the fish is cooking, place a separate small skillet over medium to medium-low heat and add the olive oil and chopped shallot. Sauté until the shallot softens. (Use a larger skillet if making more than one serving.)
  2. Add the okra and cook until the okra is almost cooked through. About 5 minutes.
  3. Add corn and cook for about 2 minutes—enough time to warm up the corn while keeping it crunchy.
  4. Remove skillet from heat and add tarragon and crème fraiche. Mix until the crème fraiche liquefies, creating a nice creamy sauce.
  5. Place the fish fillet on a plate and top with the creamed okra and corn mixture.
Enjoy!

Labels: , , ,

July 23, 2006

Baby Octopus in Tomato Sauce

After eating at Can Ganassa in Barcelona where I had a baby octopus in tomato sauce dish, I became obsessed with recreating the dish at home. Not to mention, what a great way to “re-visit” Spain while sitting in my New York City apartment?!

This octopus dish was just so amazing. The tomato sauce was what truly made it as it was so simple and fresh yet bold with flavor. The baby octopus was the perfect accompaniment because its subtle taste allowed the sauce to shine, and the tentacles helped grasped all that great sauce.

Tina, who ate at the restaurant with me, and I agreed that the tomato sauce included garlic, capers, and anchovies. So this is what I went with for my recreation. I was also sure to use good, crushed tomatoes to ensure the necessary fresh flavor.

Here is how I made it (per serving):
  • 1 tsp Olive oil
  • 2 Anchovies
  • 1 ½ cups Canned crushed tomato (see Note 1)
  • 2 Garlic cloves, sliced
  • 20 Capers, chopped
  • 1/3 lb Baby octopus (See Notes 2 and 3)
  • ½ cup Sherry (or white wine)
  • Bread, to serve with (optional)
  1. Over low heat in a small pot, add oil and anchovies. As the anchovies heat up, break them with the back of a large spoon. The anchovies will eventually disappear into the oil and develop a nice, nutty flavor (not fishy!).
  2. Add the crushed tomatoes, garlic, capers, and octopus. Cover the pot and let the sauce simmer for about 20 minutes.
  3. Uncover and add sherry. Raise heat to bring the sauce to a rapid simmer for 5 minutes (this is to burn off the alcohol of the sherry).
For a twist, this dish would also be great with kalamata olives and basil.

Enjoy!

Notes:
  1. When choosing your canned tomatoes, be sure to buy the crushed tomatoes. Avoid tomatoes that are canned in a “thick puree” or include seasonings (such as basil). You only want the pure, crushed tomatoes.
  2. If you are unable to find baby octopus (or if it gives you the hibby-jibbies), you can use squid as a substitute. I have made this dish with both octopus and squid, and both options were great. However, I will note that the baby octopus tentacles do a better job with holding all that fabulous sauce.
  3. The baby octopus I bought had already been cleaned, but if yours have not, check out this link to learn how to clean them.

Labels: , , ,

June 04, 2006

Jamie Oliver’s Pan Seared Scallops with Crispy Bacon and Sage Salad

This past weekend my friend Gemma hosted our group of friends at her place for the weekend in honor of our friend, Allison, who is sadly moving to San Francisco. Despite the rain, we made it through a Met’s game at Shea Stadium (well, through the 6th inning—it was pretty cold). Then Gemma surprised us with a nice dinner for the evening—just what we were in the mood for! What a great way to spend some time with a friend who is moving, where we can just eat at our leisure and hang out all night talking.

Since the weekend was in honor of Allison, Gemma asked her to choose the menu. Allison’s choice for the entrée was Jamie Oliver’s Pan Seared Scallops with Crispy Bacon and Sage Salad. Evidently Gemma has made this dish for Allison in the past, and it is her favorite.

After we munched on a selection of olives, Italian cheese, and smoked sausage; dinner was served. I can understand why this dish is Allison’s favorite. There are a lot of flavors layered into the salad that compliment one another very well. The salad is also relatively light for a summer meal, yet has a bold, warm flavor.

To make this dish yourself, the following is the recipe (for 4 servings):
  • 12 thin slices of streaky bacon or pancetta
  • 2 tbsp olive oil
  • 8 leaves of fresh sage per person
  • 12 scallops
  • Salt and freshly ground black pepper
  • Juice of 1 lemon
  • 8 heaping tbsp cooked lentils
  • 4 large handfuls of green salad leaves
  • Olive oil and lemon juice dressing
  1. Fry the bacon or pancetta in a small amount of olive oil in a hot pan.
  2. When the bacon or pancetta is nearly ready, add the sage. The bacon and sage will cook and crisp up at about the same time.
  3. Once they are cooked, take them out of the pan and place them onto some paper towels to drain.
  4. Put the pan back on the heat and, when it is very hot, add a little drizzle of oil and fry the seasoned scallops.
  5. These will take about a minute each side; the skin will go slightly crisp and golden brown.
  6. When both sides of the scallops are cooked, squeeze the lemon juice over the top and give them a stir. This will start to caramelize the outside skin even more.
  7. Take the scallops out of the pan and put them into a dish.
  8. Using the same pan reheat the lentils.
  9. Dress the salad leaves with the olive oil and lemon dressing and divide between 4 plates.
  10. Sprinkle the crispy bacon and the crispy sage leaves over the 4 salad plates. Then place the scallops around the salad.
  11. When your lentils are hot just sprinkle on top.
Enjoy!

Labels: , , , , ,

April 22, 2006

Salmon with Creamed Leeks

Ever since I made Martha Stewart’s Chicken and Leeks with Crème Fraiche dish, I have been craving more dishes with leeks. So I came up with this salmon dish to satisfy my leeks craving, and I must say it certainly did the trick! The idea is similar to Martha’s, but the flavors are a bit lighter. I must point out that this is definitely one of my favorite dishes that I have made!

So here is how I made it (per 1 serving):
  • 1 Leek
  • 1 1/2 tbsp Olive oil
  • 1/3 lb Salmon filet
  • 1 Lemon slice
  • 1 Shallot, chopped
  • 1/3 cup White wine
  • ¼ cup Crème fraiche
  • ¼ tsp Lemon zest
  • Salt and pepper
  1. Turn oven on to 350 degrees Fahrenheit.
  2. Trim the dark green part off of the leeks leaving only the white and light green leaves. Also trim off the other end’s roots. Cut the leek in half length-wise. Then cut width-wise into centimeter-wide pieces. Place these pieces into a colander or strainer and rinse under water to rid all dirt. Shake excess water off of leeks.
  3. Place leeks into an oven proof omelet pan (8” or larger) and toss with 1 tbsp olive oil.
  4. Place pan in oven and roast leeks for about 20 minutes. This may take longer for more than one serving. The leeks are ready once they begin to brown.
  5. As leeks are roasting, place salmon on a tin foil sheet that is large enough to wrap the fish. Rub remaining olive oil onto fish and surrounding tin foil that will touch the fish once wrapped (including underneath the fish). Place the lemon slice on top of the filet and finish it with some salt and pepper. Now loosely wrap the salmon with the tin foil like a package. Place the wrapped salmon in the middle of a baking sheet.
  6. Place salmon in oven and let cook for about 12 minutes. Generally, it should bake 35-40 minutes per pound of fish. When the fish is cooked, carefully un-wrap the tin foil and discard the lemon slice.
  7. The leeks will likely finish roasting around when the fish is finished baking. Once the leeks begin browning, remove them from the oven and place the pan on the stove over medium heat. Add the chopped shallot and sauté for 1-2 minutes.
  8. Add the wine to the leeks and let reduce to half. Then mix in the crème fraiche and lemon zest. Add salt and pepper to taste.
  9. Place the salmon filet on serving dish and top off with the leeks.
Enjoy!

Labels: , , ,

April 05, 2006

Bread & Squid Salad

On Sunday as I was getting ready to meet up with my friend for brunch at Inoteca, I had the Food Network on in the background (generally what my TV is always turned on to!). Boy Meets Grill with Bobby Flay was the show, and I caught him making a salad with grilled tomatoes, bread, and squid mixed with a mint leaf dressing. I did not catch the details, but I knew it was definitely something I wanted to try.

Growing up, my mother (aka, “Momma”) used to make such a great bread salad that was similar to this. Her’s was using bread that was lightly toasted mixed with diced tomatoes, basil, kalamata olives, and balsamic vinaigrette. I loved the simplicity of this salad yet how flavorful it was. The bread pieces would soak all that vinaigrette goodness yet remain slightly crunchy. This mixture of textures was such a refreshing delight, especially on warm days.

Walking home from brunch on such a beautiful Spring day in New York, I knew I had to make this salad as an ode to the start of warmer weather! So I picked up the ingredients that would allow me to make a combination of Bobby Flay’s and Momma’s salads. The result—perfectly yummy!

Here is how I made it for about 2 small servings (measurements can be very flexible):

Salad
  • 8 slices of baguette bread, about 1 centimeter thick
  • 3 tbsp olive oil
  • 5 squids
  • ½ large tomato, diced
  • ½ cup of chopped basil
Dressing
  • 2 tbsp balsamic vinegar
  • 3 tbsp extra virgin olive oil
  • 1 shallot, diced
  1. Brush slices of bread with olive oil on both sides, and then place in slices grill pan over medium-high heat. Let grill until lightly toasted with grill marks. If you do not have a grill pan, toasting bread in a toaster or oven will work as well.
  2. As bread is toasting, start making dressing (be sure to keep an eye on the bread, though, to make sure it does not burn!). Mix all dressing ingredients together well. (See Note 1)
  3. When bread is properly grilled (or toasted), start grilling the squid. You only need to cook the squid until it becomes opaque, about a few minutes on each side.
  4. As squid is cooking, cut the bread slices into bite-size pieces.
  5. Once the squid is cooked through, cut the squid width-wise into bite-size pieces.
  6. Toss squid, bread, and the remaining ingredients in a bowl. Add salt and pepper to taste.
This is a great salad—Enjoy!

Notes:
  1. In order to best emulsify the oil and vinegar, first add the vinegar to your bowl. With one hand rapidly whisk the vinegar. While whisking, slowly pour in the oil with the other hand.

Labels: , , , ,

January 20, 2006

Poached Salmon with Artichoke Puree


This is one of my favorite recipes that I have created. It is super easy, quick to make, and healthy. Furthermore, this dish is great to make when you are entertaining because it does not take you away from your guests for very long and yet the final product looks and tastes quite impressive!

As with most my recipes, I came up with this one by wandering around my grocery store and eying the various foods I love. When I saw that the frozen food section had artichoke hearts--which I LOVE--I knew I had to make something with them. Since artichoke hearts have a strong flavor, I knew they needed to be paired with another strong flavor so that is how I decided to prepare it with salmon. However, because there are strong flavors involved I needed to keep the various tastes simple so that it was not overwhelming. That is why I only poach the salmon and add no flavors to it except lemon. I then wanted to add the tomatoes since they have such a nice mellow and refreshing taste. Finally, I added the asparagus because, frankly, I like their color and shape for the dish.

Here is what you need to make the dish (per serving):

Frozen artichoke hearts (9 oz.)
1 lemon
Olive oil
Salt
Salmon (about half a pound should be good)
Cherry or grape tomatoes (about 8)
Asparagus stalks (about 8)

And what you do:

  1. Place frozen artichokes in the microwave and cook as directed on the box (mostly likely, you will need to microwave the artichokes for 5-6 minutes in a microwavable bowl).
  2. As the artichokes are cooking, prepare the asparagus and tomatoes. Take a stalk of asparagus and hold both ends. Now bring the two ends together as if you are folding the asparagus in half. In this process the asparagus will snap such that you can throw out the bottom part where it is a bit tougher. Repeat this with the remaining stalks. For the tomatoes, cut each in half length ways.
  3. Place salmon in a pan and pour water into the pan until the water reaches half-way the height of the salmon. Place two thinly sliced lemon pieces into the water for flavor and turn stove to a medium to medium-high heat. Cook until salmon is cooked thoroughly and is firm to the touch (about 4-5 minutes on each side). (See picture.)
  4. Start cooking the asparagus by either grilling (as I did here), steaming, or lightly broiling.
  5. While salmon and asparagus are cooking, take cooked artichokes and place them into a food processor(1). Add olive oil (about 1/4 cup) and salt to taste. Also add the juice from half a lemon and about a teaspoon of the lemon's zest(2). Puree all ingredients together until the artichokes are nice and smooth.
  6. Spoon artichoke puree into a shallow bowl or plate. Take salmon and place it on top of the puree. Place the asparagus and tomato halves on top in a decorative fashion.

Notes:

(1) Food Processor - I am obsessed with my food processor and can not imagine life in the kitchen with out it. So if you do not have one, I strongly recommend going out and getting one! They are expensive, but I find that the department stores put them on really great sales every now and then so just keep your eye for these awesome sales. As for this recipe, if you do not have a food processor I think you can still make a variation of the puree. I have not actually tried this, but I imagine after the artichokes are cooked, you can spread them out on a cutting board and run your knife through them until they are in small chunks. Then, as the recipes notes above, add the olive oil (about 1-2 tbsp), salt, lemon juice, and zest to taste and mix well.

(2) Lemon Zest - You will need a microplane (or other fine grater) to do this. If you do not have the proper utensil, no worries, just add some more lemon juice instead. When you do zest, only take the yellow part off of the lemon. The white part is bitter so you do not want that.

Labels: , ,